Monday, December 17, 2012

DIY Green Sippy Cup

Ok so I have tried many different sippy cups. The only one Levi, my son, knows how to drink from are the ones with straws. Well they have started growing mold in places I cant get too. I've tried leaving them in bleach over night and ... nothing. So I saw on Pinterest how to make Mason jars into sippy cups! But then I started thinking.... While this is nice and green and inexpensive I'm still giving a toddler glass so I bought on EIO Sleeve. They were a little expensive... But fit perfectly on a half pint jar.

I used a 1/4" drill bit so I believe the grommet size was 3/16"? (I took in a straw to make sure I was getting the right size.) I'm sure I looked funny carrying a straw into Ace Hardware...


You might want to file the edges of the hole down because it will a bit rough. This is where I had my husband feel helpful. I let him put the grommet in. :)


When putting the straw in I got it a little wet and bent the straw in a bit. I actually trimmed the straw because the 1/2 pint cup was smaller than the straw.


 The Total Cost: 12 pk of 1/2 jars = $10.71 which comes out to $0.89 each and the grommets were $0.34 each. $1.22 TOTAL!!!

Update: After using thisfor a little bit we've run into a small problem. It is so leak proof that there is not a continuous way to suck which frustrates Levi. I think I'm going to have to make another small hole for air to come in through and put another grommet on it so he doesn't hurt himself.

Has anyone else run into this problem and how did you fix it?

Wednesday, March 21, 2012

DIY Moss Wreath


SO I saw this picture on another blog and just had to have the wreath but refused to pay more than $30 for it... I decided why can't I make this? Oh but I can! So I went to Michael's (with my 40% off coupon and bought some moss) and also bought different moss at Walmart for $2 a bag (which I actually liked the best), the hottest hot glue gun (I figured why not?), and at a later date went to Hobby Lobby (also with a 40% coupon) and bought the green Styrofoam wreath. I got the 12", if anyone cares.


here's the moss from Walmart:


and the moss from Michael's:


So while I was babysitting I decided to start. It is very easy and a fairly quick project. Only about an hour. BUT LET ME WARN YOU 2 THINGS!
  1. It is VERY messy... the moss that is.
  2. The glue that comes out of the hot glue gun is... hot. I mean extremely hot. I may or may not have gotten some on me and may or may not have been able to get it off in time... ouch >_<
I got a picture of it before it was done:


What was neat about the Wamart moss was that I could actually roll it out because it was one big moss sheet... or whatever you would like to call it. Then I filled the holes with the Michael's stuff.

And here it is done!


Up on my door! (yes I know I have an ugly door... that's my next MAJOR project... Installing a "new" door.)

Wednesday, March 14, 2012

My Free Heavy Trash Table

I wasn't really sure how this would turn out but I sanded and sanded and sanded. I had huge gouges everywhere (which is why I sanded and didn't just strip it). After doing research AFTER I had painted like 6 coats of paint on it (I wanted that brand new store look) I didn't realized how important primer is... Next time I will do that. But i did go ahead and put a sealer on it since it will be the family table.

Before:


After:

Dry Homemade Laundry Soap (HE)

So, after making 2 batches of the liquid, I just wasn't happy with the non-smell. So I looked and looked and looked and finally found a recipe that used Purex Crystal Softeners but I substituted those for the Downy Unstopables. (I LOVE THE SMELL OF THAT STUFF!) and our clothes were starting to look dingy... This recipe also includes Oxi Clean. BTW THIS IS GREAT FOR FRONT LOADERS! HE just means little suds which is perfect for front loaders.


Recipe:
  • 1 (4 lb 12 oz) Box of Borax- Found in the detergent aisle
  • 1 (3 lb 7 oz) Box of Arm & Hammer Super Washing Soda- Found in the detergent aisle
  • 1 (3 lb) Container of OxyClean- Found in the detergent aisle. (I actually use the Kroger brand because it is $4 for 3.5lbs as opposed to the name brand $9 for 3lbs.)
  • 2 (14.1 oz) Bars of Fels Naptha Bar Soap- Found in the detergent aisle
  • 1-2 (55 oz) Bottle of Purex Crystals or Downy Unstopables- Found in the detergent aisle (Optional but I do it for smell)


 I dump everything in a new trash bag and carefully roll it around to mix then put it in my gorgeous glass container I got from Wal-mart in the Household section.
 
I use a cup of white vinegar as a fabric softener. I have found that my clothes are whiter after using the vinegar as well. I read somewhere that it is because it works great with the washing soda. NO it does not make your clothes smell like vinegar. In fact, it is a natural deodorizer as well as softener!


Friday, February 10, 2012

Embroidered Love Note

Ok so on our May Babies FB page, we decided to do a Secret Cupid (just like Secret Santa) and once again I'm so not into buying chocolates and bath stuff so I found PINsperation...

So I just got the cheapest white cotton fabric and straight stitched blue horizontal lines with one Red vertical line.


I drew (lightly) lines where I was going to sew (same with the embroidered letters)


Saturday, January 28, 2012

A little birdie told me...

So I finally got around to making this after my son was born. I was trying to go for the woodlands/forest theme in his nursery.


(Me being artsy fartsy with my camera phone)


I even used the sticks from the back yard! This is a great remnants project! I bought the fishing wire on sale at Wal-mart for $2 (I can't believe it) and the eye-hole hooks at the dollar store (I get a lot of stuff you wouldn't imagine there). I also bought those $1 squares of fabric at Jo-Ann's and I did buy a package of stuffing WITH A COUPON from Hobby Lobby for $2. So this project cost me no more than $10? The Tut I used is here. I learned how to do a blind stitch here.


As you see I did the bottom bird a little different because it resembled him being hung, to me...

Wednesday, January 18, 2012

Washing Your Hair the Natural Way (with Baking Soda)

I have very fine hair but a lot of it. I can't use conditioners because apparently I am allergic to them (they make my scalp itch to the point I get sore... I know TMI) I can't use 2-in-1 shampoos, and actually MOST shampoos, for that matter. I have a very good friend that has the same problem as me, except she doesn't have as much hair. Today she told me she washed her hair with just baking soda and water. So I tried it. OH.MY.LANTA. My hair is the SOFTEST it has EVER been. I didn't even need leave-in conditioner!!!

So here is the "recipe" I used:

1 part Baking Soda
2 parts Water.

Now I actually used a cup of baking soda and 2 of water because I decided to bathe in it too. I figured why not? We can wash our hair, clothes, and teeth with it. Why not body? I feel pretty clean!!

Please keep in mind that this recipe does NOT suds up... I think that's why I MAY have gone a little over kill on the amount...


Now here are a couple more recipes I wouldn't mind trying:

Fair Companies:

  • Baking soda (aka bicarbonate of soda).
  • Apple cider vinegar or one lemon.
  • A container (a recycled shampoo bottle works well).

 EHow Baby Shampoo:
  • 12 oz. of distilled water
  • 4 tablespoons Castile soap flakes (or shavings from a Castile bar)
  • 1 to 2 drops of pure essential lavender oil

Monday, January 16, 2012

Something that my husband actually ate!

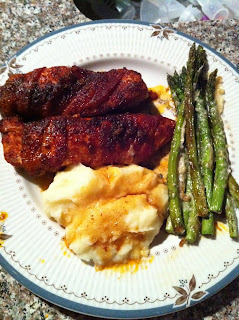
I go this recipe from a fellow FBer and decided to try it because it was simple and I thought my husband would actually like it because it had two of his favorite things... Chicken and bacon. I don't know what you call it... It is kind of a variation of Heart-Attack Chicken.


Instructions:
1)      In a bowl mix:
a)      2/3 cup brown sugar
b)      1 tbsp chili powder
c)      ½  tsp salt & pepper
2)      Cut boneless/skinless chicken breasts in half long ways
3)      Wrap a piece of bacon around each breast
4)      Roll around in the brown sugar mixture
5)      Place in a baking dish with about 2-3 tbsp of olive oil


 6)      Pour the rest of the brown sugar on top and bake at 400


Now I ate it with mashed potatoes and a salad... You HAVE to have some vegetables right??
Here's a pic of my friend's plate:

MMMM Looks so good!

Thursday, January 5, 2012

No Sew DIY Roman Shades

We moved in our house over a year ago... And I'm just now getting around to putting up curtains. Well if you have looked into getting window coverings, you know that they are pretty expensive... Well of course I looked for a cheaper way of getting this gorgeous look and found this blog and decided to give it a try.

All of the tutorials I have looked at use the cheap plastic blinds but the fabric that i bought was much heavier than theirs so I went over to my local Home Depot to see if they had some already cut (but messed up) faux wood blinds. Sure enough they did! So I bought them for $8 and came home and went to work. I can't do things by measuring... for some reason it just does not compute so I did it by looks. I have a fairly small kitchen window and I attached TP to the slats and figured where I want the folds.


When I figured out the placement I then laid the blinds out completely:


Then I went to the bottom and popped off the thingy that holds everything in.


See?


I then removed the necessary slats.


So the next things I did was lay the blinds face down on top of the material. 


Then fold the edge as to hem it.


Then fold the top.


Here's a better look:


Now remember NOT to glue the VERY edge of the top so that you can put it back into the hold and covering it.


Then you glue everything down, fold, and let dry.


Monday, January 2, 2012

Dated Wall Art

So I had a Secret Santa from my birth board this year and simply thought the idea of getting her soaps and lotions was just over done, so when I came across this idea I knew I HAD to do it.

I started out with some frames that I got from Goodwill (yes I got 2 so I MAY reuse the pictures)

I spray Painted it with Rust-oleum's Silver paint.


After that dried I antiqued it with Valspar's Antiquing Glaze


I had some nice 12x12 scrapbooking paper lying around so I cut it to fit.


I secretly found out her birthday, hubby's birthday, wedding day, and baby's birthday and voila:


Before and After:

Dressing Up Your Thermostat

So one day I was wasting time getting valuable ideas on Pinterest when I came across a weird and completely off the wall post. Putting a frame around the thermostat. Yeah sounds funky but it's actually cool! Here's the original blog and here is my version of it:

Before:


I didn't like the color of the frame but I LOVED the detail. The color was almost gold... yeah Gold is so not in... my house. So I went down to Lowes and bought a $3 can of Rustoleum Silver spray paint and


After spray painting it and letting it dry, I took a dry paint brush and barely dipped it in the lid of the glaze and painted it over the silver paint. I dabbed it in every little nook and cranny on the detailed frame. When I felt it had enough I took one of my husbands red garage towels and wiped it off. Now keep in mind this dries fairly quickly so that why I didn't take any pictures of this process... After that dried I did one more "coat" and let THAT dry and this is what I came out with:

After:


Might as well decorate everything around the house! If you can't hide it, decorate it!

DIY Cloth Storage Bins

Ok so now that I'm ALSO trying to get more organized yet do things wallet friendly I have been looking for a lot of DIY organizing things. Thanks to Google and Pinterest, I have found some tutorials that I think are worth trying without having to go out and get tons of materials.

  1. Urban Nest's DIY Cereal Box Storage Bins (I really like this idea except I'mworried about how durable they are)
  2. Kargrrl's Square-Bottomed Canvas Bucket
  3. Jezze's no-interfacing storage basket

Homemade Dish Detergent

 Below is the recipe I used and it did NOT work. So I changed it. I added 1 cup epsom salt and 1 cup Lemi-Shine. That worked! So here's the Recipe:

Recipe for 1 batch of Dishwasher soap:
1 cup Borax
1 cup Arm & Hammer Washing Soda
½ cup salt (I used epsom salt)
½ cup citric acid (I *HIGHLY* recommend Lemi-shine. Walmart sells it for less than $4)


Now I that I have made several homemade things for around the house I decided that when I found the dish detergent that I would give that a try since everything worked out so well. I tried the first recipe since I had everything already from making the laundry soap and for Christmas my mom bought me cute plastic containers to put the soap in! so here's the first recipe I used:

DO NOT USE THIS RECIPE!

  • 1 cup borax
  • 1 cup washing soda
  • 4 packages of lemonade mix
 I also put vinegar in the rinse compartment. I read several places that it can get clumpy so I'm glad I expected that because it do that but if I give it a quick stir I don't think that will be a problem. But this recipe still isn't quite getting my dishes clean. It is leaving residue on my clear glasses so I will try different recipe. Other recipes have used baking SODA instead of washing soda or used salt/kosher salt/pickling salt/epsom salt... I don't know which to try first! There are so many and I HATE wasting things!!!! Does anyone have any suggestions?

Homemade Febreze

Well as we all know, Febreze is soooo good but oh so expensive. At $4-$9 I can't afford to spray it everywhere like I'd like so I did a little research and found a lot of recipes and made my own!

Everything you need is already around your house (and if it isn't, then you can pick the stuff up anywhere!). I got a spray bottle from the dollar store (or Walmart or Home Depot) for $1.

Items needed for 1 batch:
1/8 Cup Any Fabric Softener (if you use the Gain, it will smell JUST like the Gain Febreze!)
2 Tbl Baking Soda
Fill the rest with hot tap water and you're ready to start destinking your fabrics!
Now I do have to gently shake it up every time because the baking soda settles to the top and make sure the fabric dries before using it!

Homemade Liquid Laundry Soap

Well I started cloth diapering and choosing a detergent that was cloth AND wallet friendly wasn’t working for me. So I decided to look up some recipes. Everything used in this recipe can be found at Walmart down the laundry aisle! To start making this will cost you no more than $12 AT MOST! (FYI HE just means it doesn’t suds up a lot.) Another note, My husband works in a greasy place making engines and this takes the smell right out! When his clothes are extra dirty I add hydrogen peroxide (instead of bleach because H2O2 is non-chlorinated bleach) But I still don't wash his work clothes with ours.

The items you will need to make 1 batch:

(1) 5 gal bucket (Home Depot’s bucket with lid is better than Walmart’s… in my opinion)
(⅓ -½) bar of laundry bar soap (I used 123 but you can use ZOTE, Fels Naptha, Ivory, or any other laundry bar.)
(½) cup washing soda (I used Arm and Hammer… that’s the only brand I have ever seen)
(½) cup borax powder (Once again the 20 Mule Team is the only brand I have seen.)
(2) gallons water
16 drops of essential oil (optional)
Directions:
  • Grate the laundry soap (good way to clean you cheese grater too!!) Since my bar was larger I only did about ⅓ of the bar. Add 6 cups water and heat it until the soap melts.
 
  • Add the ½ cup washing soda (make sure you are NOT using baking soda!!!) and the ½ cup borax and stir.


  • When it is completely dissolved, remove it from the heat and pour 3 gallons of water into a 5 gal bucket.

  • Add the soap mixture and essential oil and stir. (I used eucalyptus because I have always been told it kills dust mites, bed bugs, and other yucky stuff)

  • Let the soap sit for about 24 hours until it gels. (It will seem like watery jello!)

  • Use a ½ cup detergent per load of laundry.

  • If you want to use a fabric softener, vinegar is a great replacement and doesn't make your clothes smell like vinegar.